

Make a page from history
The history and content of meetings all on a SharePoint page

Hi Peer,
It’s easy, and smart, to take a page from history. And, to make a SharePoint page for history… well - that’s easy and smart, too. 😊 Think of them as mini dashboards filled with the right information, the right content — with the right context. SharePoint pages are easy assets to promote and view: Via Outlook email, in Microsoft Teams as individual tabs, as news articles you publish on a quarterly basis, and more. To make history unfold smoothly with impact (and searchability/discoverability), it’s becoming important to drive clarity before, during, and after a meeting — especially if it’s a series of business reviews or event planning.
In this article, we’ll learn in the context of creating a post-meeting page. I’ll focus on the basics of creating a SharePoint page, pulling in meeting recording(s), the PowerPoint presentation, naming key presenters/owners, links to additional materials, and more — all on one page. I’ll include tips, how easy it is to then promote out for broader internal reach, and a bit about some upcoming Viva tech for those that drive broad, internal comms on a regular basis — Viva Amplify (which uses the SharePoint page as its creation and consumption platform within Microsoft 365).
Get to know the SharePoint page
It all starts with + New on a SharePoint site and clicking Page. Then, you choose from a template or start in my favorite way: Blank. Next, you design the layouts of each section and take advantage of the many available web parts — the true building blocks for your historical post-meeting page. Each kind of web part is a container for a certain type of content—text, image, list, chart, and so on.
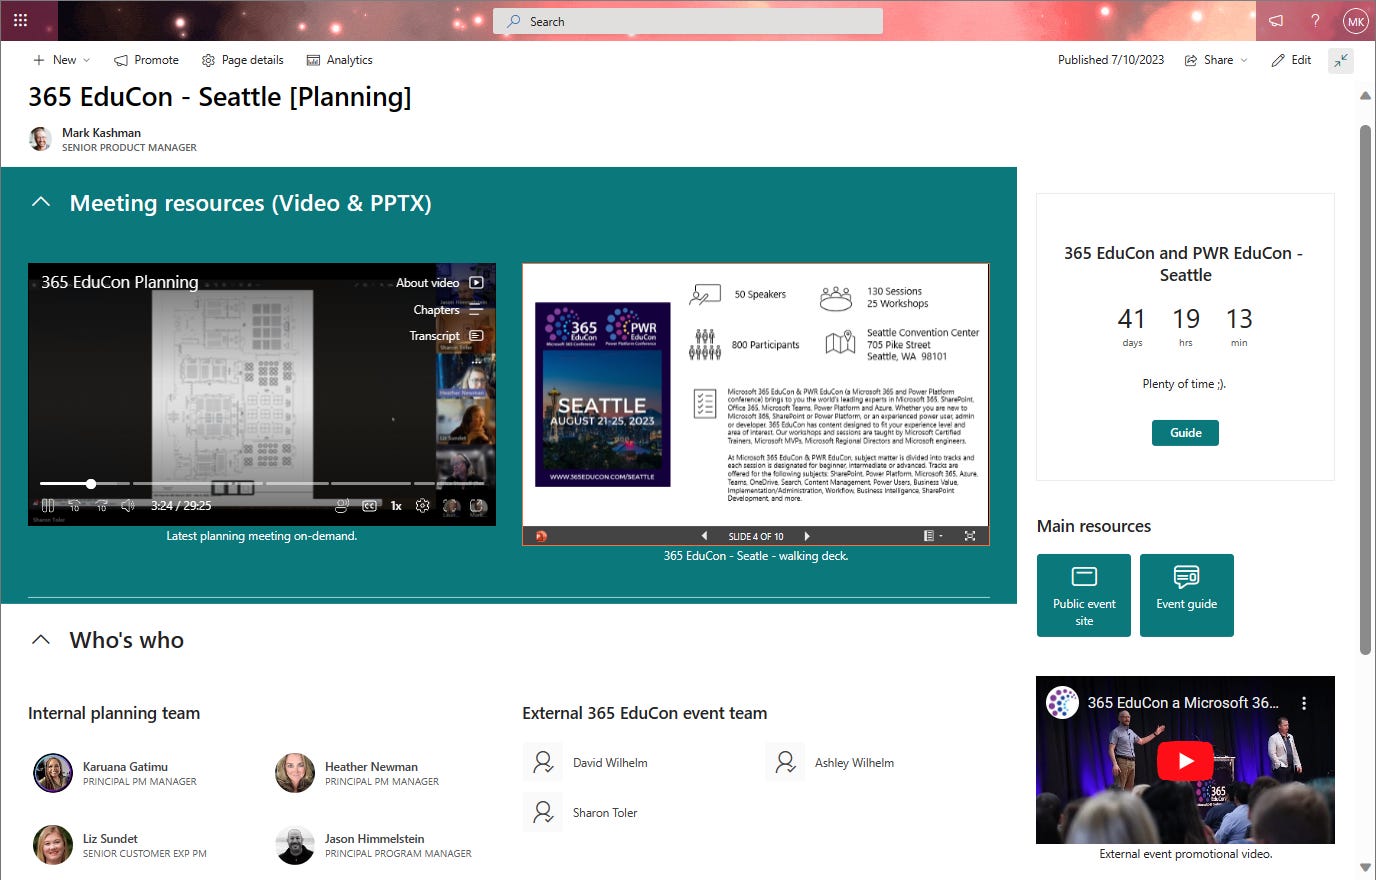
Using the above screenshot as an example outcome, let’s summarize the main components so that it’s easy to follow along AND design your own when you need to:
Create a page and give it a title.
Click the “+” sign on the left-hand side once or twice to create a few sections - and mix it up with 1 column, 2 column, and/or split 1/3 2/3 columns - and bonus points if you use a Vertical section on your page. This gives you space on the right-hand side that spans top to bottom (where you see the countdown, resources and YouTube video above)
In the first horizontal section, add two File and media web parts.
In the first one, grab the URL from a Teams meeting and paste it in. In the above example, that’s the “365 EduCon Planning” video, which is simply a recorded Teams meeting.
In the second one, copy/paste the link to the preferred PowerPoint file. You can navigate and pick, too; though I find it easier to open the PPTX file and “Copy link” - both ways work. In the above example, that the one that has a Seattle logo on slide 4 of 10.
In the second horizontal section, add a People web part and a Quick links web part.
Use the People web part for anyone who is within your organization, you can type their name in and do a directory look up and pick the right one; this makes it an active People card on hover for your readers. You, too, can give this a unique header title to specify who they are.
Use the Quick links web part for anyone who is outside your organization. Again, type their name and leave it as simple text, or hyperlink out to their profile on LinkedIn. You, too, can give this a unique header title to again specify who they are (in this example, to note that they are external).
For the vertical section, add a Countdown web part, then a second Quick links web part, with a YouTube web part at the bottom.
For the Countdown web part, set the date of the upcoming event, add a graphic, a simple text phrase - and the web part will show a countdown in days, hours, minutes.
Use the Quick links web part to highlight a few key resources. You can add as text with links and type in unique header text and choose another layout style to differentiate these links from the people’s name from before.
And leverage the YouTube we part to pull in video that has been published by you or anyone else; again, choose something that adds helpful context; like above where we pulled in the event team’s promo video.
Note | You can grab the handle of each web part and move it wherever you want - across sections, from horizonal to vertical — and the programmed content stays intact.
Tip | Make your horizontal sections collapsible and shade every other section. Select the section you want to make collapsible, then select Edit Section to the left side of the page. In the Section formatting pane, under Make this section collapsible, switch the toggle on. And choose 1 of four differing color shades for each section’s background.
There, we’ve made a page from history. In this case, the history of an event planning meeting that easy to catch up on and share to jump into related content, people, and additional resources.
Go further and learn all about creating and using modern pages on a SharePoint site in Microsoft 365; may history look upon you kindly.
Note: You must be a site owner or SharePoint administrator to add pages. If you are a site owner but you are unable to add a page, your administrator may have turned off the ability to do so.
Increase your reach: Promote your page
You’re happy with the layout of sections and content… now it’s time to get the word out. It’s searchable by default once the page is published. Everything below is to help you target and increase your reach.
Add the page to site navigation: Adds a link to your page, using the page title, to the left-side navigation. Now when people visit the Home page of the site, they’ll see your page as a key site resource.
Post as News on this site: Adds a News post to the Home page of your site. This simply takes the page as is and “enters it into the broader news service.” AKA, your page flows to the News web part, flows up to a parent hub site, and out to consumption aggregates like the SharePoint start page, Viva Connections, and the Microsoft 365 app — all aware of who you (as the reader) are with access permissions intact.
Add your page as a tab in Microsoft teams: Take an explicit action and make it easy for your team members to “tab over” to the SharePoint page within your working channel, right alongside your content and conversation.
Email: Allows you to send an email with a preview of the page and an optional message to your selected recipients. You can send to individual(s) and groups.
Viva Engage: Allows you to send the page through your organization's Engage communities as a new post.
Copy link: The one I use when someone asks for a meeting recap, I save keystrokes (as Scott Hanselman put it) and reply, “All you need to know is right here: [link to your beautiful, historical SharePoint page].)
Clicking the “📢 Promote” button on any SharePoint page or news article brings up the promotion pane on the right side:

Coming soon: Viva Amplify
Microsoft Viva Amplify is an internal communication campaign that allows you to create something once and publish it to multiple distribution channels to share throughout the organization. Amplify empowers leaders and communicators to elevate their message and energize their people by meeting employees where they are. And as I mentioned before, Amplify leverages SharePoint pages to design and distribute internal communications — so more power to you if you know how to design a nice SharePoint page; which you now do ;).

At its core, Amplify helps:
Communicate easier | Centralize communication processes in a single space, so you can save time and focus on what matters.
Communicate better | Write messages that stick with writing guidance and reporting from your organization.
Be heard | Drive engagement with your message by meeting employees where they are.

Keep an eye on the Microsoft Viva community site for more details.
Communicate broad and often to keep all in sync
I want to highlight a good Microsoft Learn article, “Corporate communications overview” when using Microsoft 365; it provides strategic perspectives across a broader landscape. And keep up to date on all things SharePoint: @SharePoint (Twitter) @MS.SharePoint (Threads) | SharePoint Community Blog | Feedback.
To all future Page’rs out there, I salute you. 🫡 Give it a try and make history, page by page. You will be a respected documentarian, one that saved people time and organized the intranet to be less grab bag, more guide.
Cheers, “Paging” Mark Kashman
What a great article about creating SharePoint pages - Very good and clear tips and tricks. Thanks Mark.