Conditionally formatting Lists - a visual IFTTT™ if you will
Under the right conditions, a little color and style makes information "speak"
Hi Peer,
I’ve always been a fan of IFTTT™ concepts (“If This Then That”) in what it can do to improve and streamline repeatable tasks. For the purposes of this article, I’m going to lean on the notion of IFTTT and push an additional “V” into the acronym, making it IFTTVT: If this, then visualize that. When information tells you more at a glance, you can go do more of this, and maybe a little less of that.
With Microsoft Lists, you can improve the visuals of columns and rows with formatting based on certain criteria of your list items - to highlight individual cells and/or entire rows. This can be based on a one time set and forget, or when certain conditions are met. “Conditional rules” are simple and sentence-based, and as you begin to blend and combine rules within the same list, it starts to “speak” to you - swaying your eyes to know immediately what’s up, and what’s not.
Below is a new 10-minute demo video that walks through all the ways you can add color and formatting based on certain criteria and conditional rules across list rows and columns:
There’s a lot of flexibility when it comes to making a list work for you - on the one condition rule: finish this article AND then try it yourself. Let’s dig in to a variety of methods available to you in Microsoft Lists.
Start with the multicolored magic of Choice fields
As you can imagine, Choice columns offer choice. And as you choose the choices, the list begins to exemplify the task at hand. It’s easy to add your choices per column. Once in, adding and updating a list item field is an easy as choosing from a drop-down menu. As the list owner you can add, remove, and adjust the various choices per column. And you can turn off the ability for anyone to add new choices - if you choose - so they only select the choices you selected to describe your information.
As a new design element, you can format the text as "pills" that surround each choice so that the choice names provide additional info, are easier to read, or just look better. As you choose a choice, it’s reflected across list views, including Gallery, and within the default view/edit forms.
Learn more how to format the pill shapes in a Choice column.
Make each row matter with row formatting
You have a wide variety of formatting options for your lists. You can use formatting to make a list easier to read, or you can create “conditional rules” to highlight certain list items based on values in the list (conditional formatting).

When it comes to seeing the state of your information at a glance, adjusting how entire rows appear makes it start to come alive - across the board (row). You can start with simple alternating rows, based solely on the design element of seeing each individual row more clearly. And then, you can up-level the smarts you build into the list by adding rules that apply a certain color and style when the rule is met.
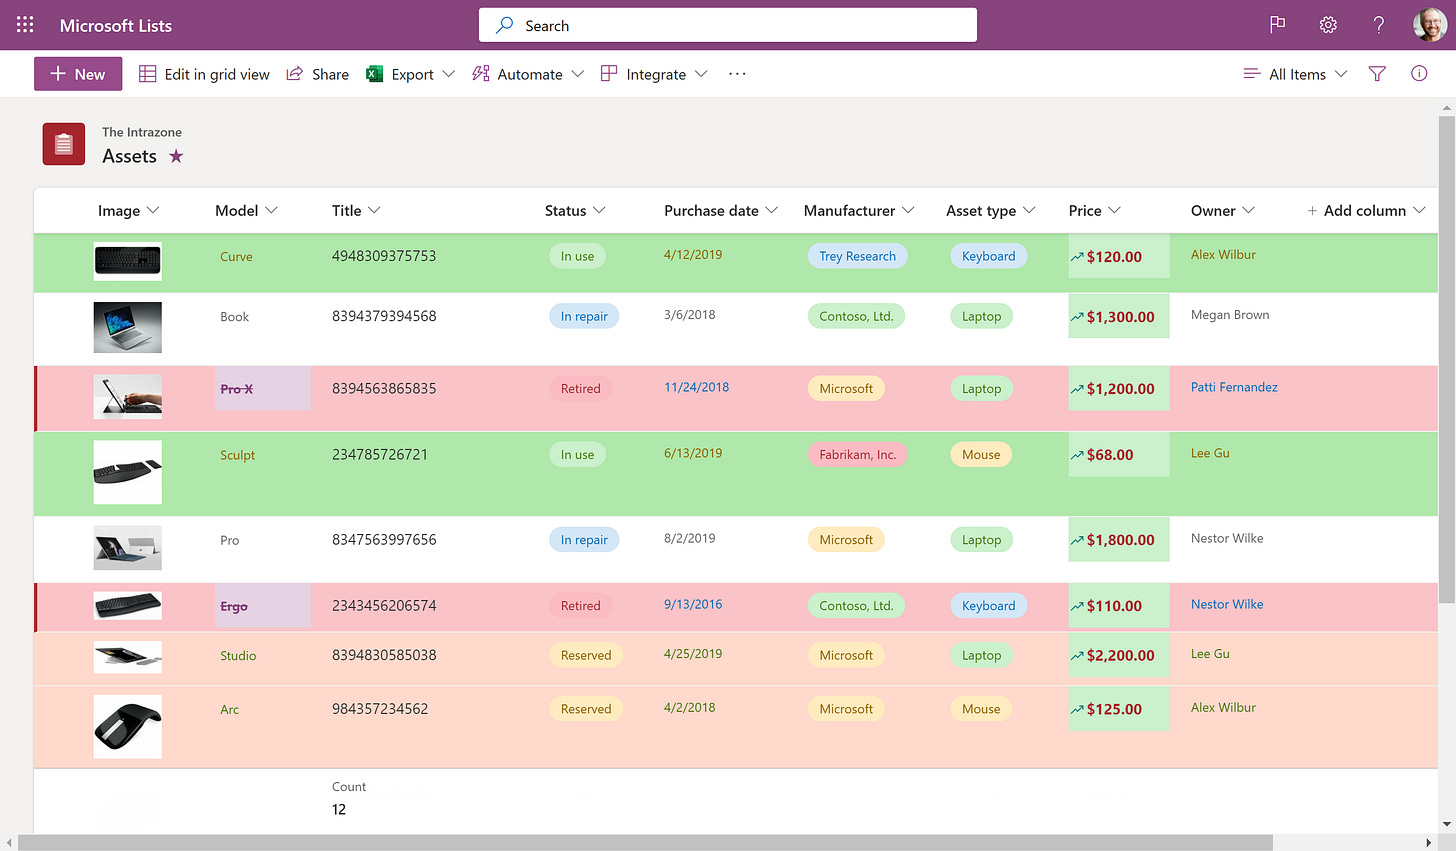
For example, open the column drop-down menu, select column settings, and format this column, and check the conditional formatting option. There, you can select manage rule to create a rule; in the above image, to highlight Retired items, your rule could read If [Status] [is equal to] [Retired], show entire list item row as [red fill with red edge borders], and If [Status] [is equal to] [Reserved], show entire list item row as [orange fill], and If [Status] [is equal to] [In use], show entire list item row as [green fill].
Learn more how to adjust rows formatting, be it alternating rows or ones that meet certain criteria.
Get more granular with column formatting
Affecting entire rows across all list items is great. But, sometimes you merely want to adjust specific columns - either all at once, or when individual list items meet a certain criteria.

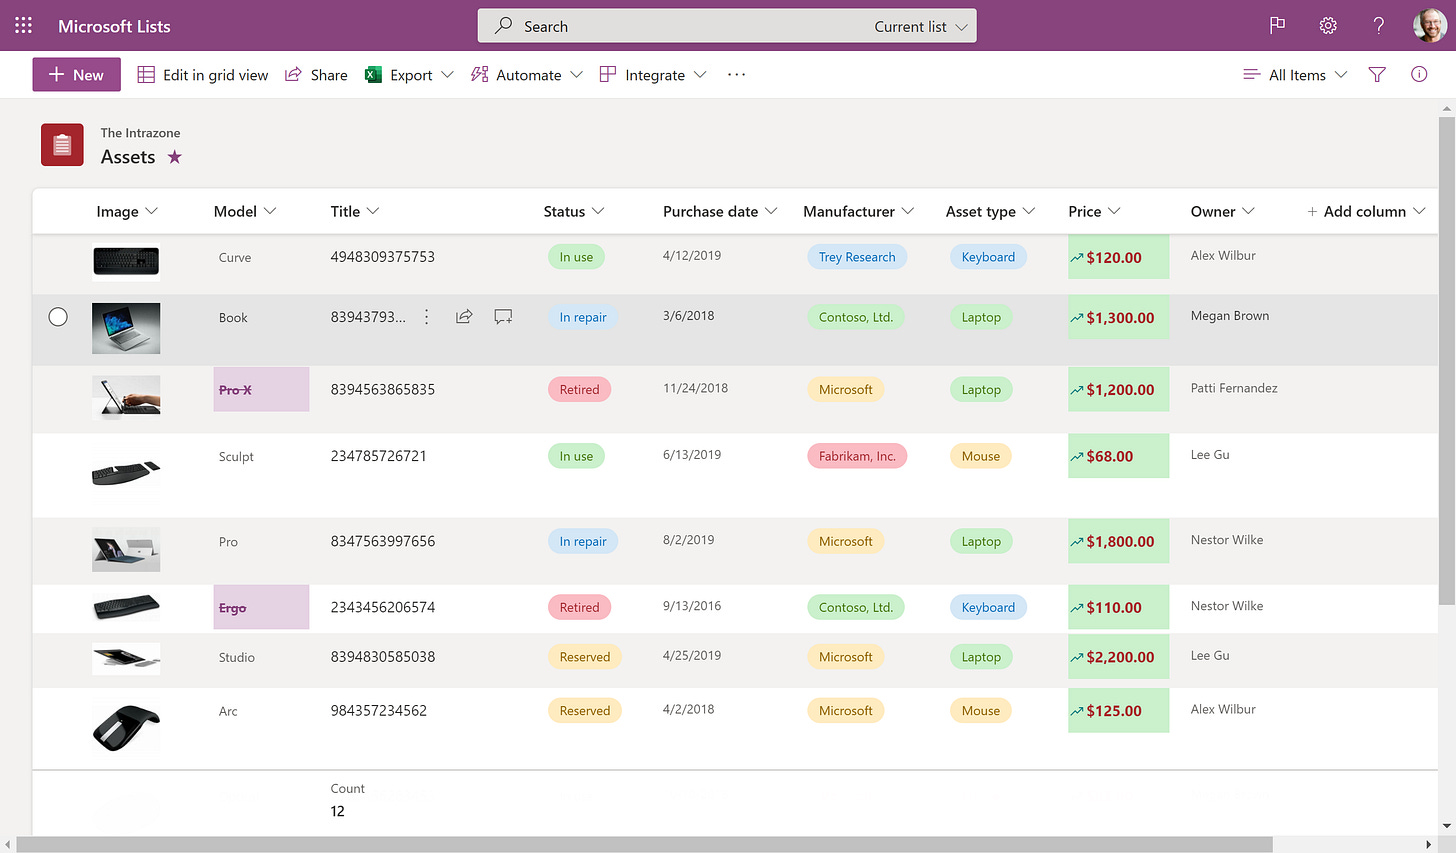
In the above image for example, to highlight Retired items, your rule could read If [Status] [is equal to] [Retired], show list item as [purple fill, bold purple font, and crossed out]. And for the [Price] column - to affect the entire column the same - show all list items as [green fill, bold red font, with up-arrow green icon].
Learn more how to format a column to change how it looks.
Final thoughts
Well, IFTTT that didn’t float your conditional boat, we’ll close it out on this note:
Once you add one or more conditions, the list starts to become more visual, pulling your eye and attention to certain things you may need to find more easily, or see as important when items get updated. Try adding conditional rules once, and for sure you’ll use them in almost every list you interact with.
And if you want to learn a few more Lists tips and tricks, check out a recent article I wrote for the SharePoint community blog, “Top 10 hidden gems: Microsoft Lists“ - includes a broader demo video, a related episode of The Intrazone, and links to learn more about Lists.
With just a few clicks, you make the list work for you, conditionally speaking of course.
Cheers, Mark “conditionally formatted” Kashman
P.S. (Pun Sharing)
Get your eye rolls ready to bake… one pun from me, @mkashman 🙄, and one from the world:


